Set up environments with AWS Organizations
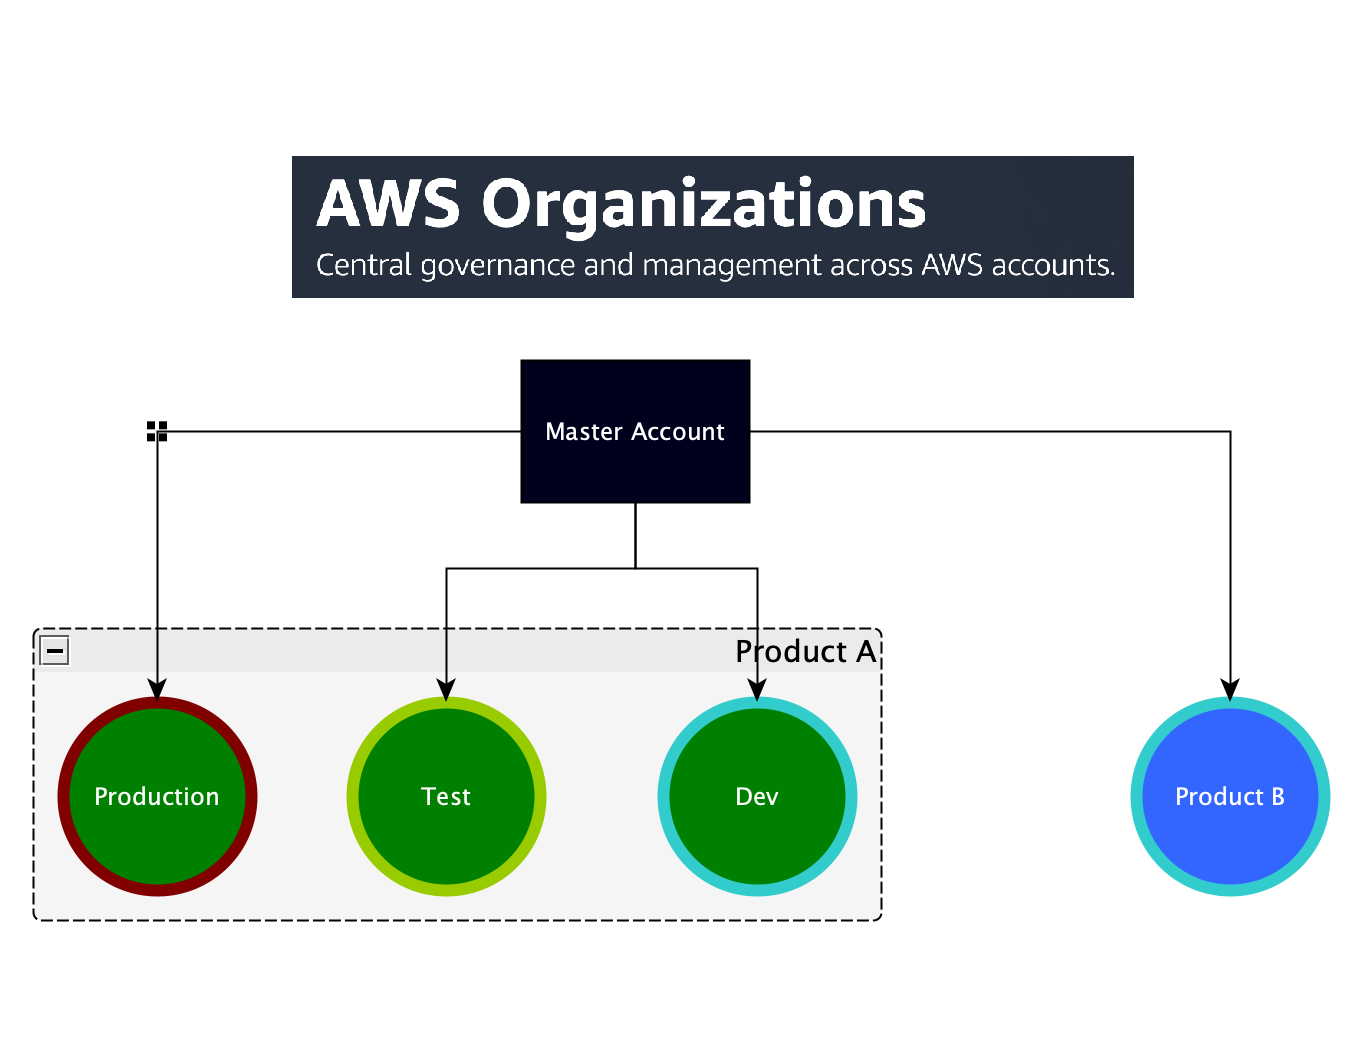
So, our use case is the following, Lupita just registered her AWS account because she wants to start her own Gaming Company, the first thing she realised she want to do, to start everything from right point it is to split her account into different separate environments, this way she can be implementing new stuff in the DEV environment, while I am testing that all is going well in our TEST environment before moving everything to Production so our clients can play our games. We also realised we need to have some things in a common place.
 AWS Organizations
My preferred option to do this task is to make use of the AWS Organisations.
It is not a difficult thing to do but it is important to understand what are we doing :)
Important consideration
AWS Organizations will create AWS Accounts and then it will link them as Sub Accounts of your master. Since the AWS Account creation is a complex process, if you do not like the name you selected you cannot simply delete your account from AWS Organization console and recreate it, because AWS will complain about a sub-account becaming orphan without any bill information.
What we will have achieved at the end of this tutorial
- Our master account
- mycompany
- Three sub-accounts that will be ready to hold Dev, Test and Prod environments
- dev.mycompany
- test.mycompany
- prod.mycompany
- A third account that will hold common stuff, for example, images and other statics
- common.mycomponany
- Role switching functionality in place to move between accounts
The only pre-requisite it is to have your own AWS account and a user with Administration previliges created in IAM
Lets start!
Creation of Sub Accounts
1.Go to AWS Organizations
-
You will see a table with 1 account only, this is your Master Account and it has a star next to its name, you cannot remove it from the organization.
-
The master account will be the owner of the users that will be able to assume the role that will allow them to go into the other accounts.
2.Press on Add account button, here you will be asked to:
- Invite an account:in case you have an account already)
- Create Account, that is what we will do.
3.Now we need to add some data for the account:
-
Full name: This is the name of the AWS SubAccount that will be created inside the organisation, we will put here our environment name, for example dev.mycompany. Remember to pick carefully this name, because change it is a bit painful (we will cover it in another post).
-
Email: This is the email that will be linked to the AWS account that will be created, cannot be the same one you used in the main account, so create emails in your domain, or, if you cannot (or you don’t want to) you can use an alias with “+”, so for example if your main account email is something like tech@mycompany.com you can use tech+dev@mycompany.com
-
IAM Role: The IAM Role that will grant a master account user to assume the role in the sub account, it is recommended to use the default OrganizationAccountAccessRole, that will be also used if we leave the text box blank, since this is the role name used around all AWS documentation.
-
And behind this small line a lot of spiders are hidden.
- Let’s breath and explain it a bit more:
- In AWS you can create, in an Account A a Role and link it to a Trusted Entity, this is an Amazon Account B that is external to our account and then you can assign then some policies to this Role
- And user of this Account B(Trusted Entity) can assume the role that is linked in the Account A.
- In our case Account B is the Master Account: mycompany and Account A is the Sub Account dev.mycompany. And if we have an user called Lupita in mycompany, she will be allowd to switch her role to assume the OrganizationAccountAccessRole in the dev.mycompany
- Important, if you decide to do not go with the standard name, make sure you remember the one you selected, because, the Role will exist in the subaccount, so, if you do not remember it, you won’t be able to switch role and go to the subaccount.
-
4.Press Create and AWS will create your sub account, and you will be redirected to the AWS Organizations main Accounts tab, do not worry if your account doesn’t get filled up straight forward, it can takes a little bit, refresh your page and hopefully you will have all filled.
5.SUPERIMPORTANT You have there your new Account ID, this is the identifier of the account that will be used to Switch Role
Switching Roles
Switching roles it is a pretty simple thing to do, but still need to be set up.
- You need to be logged with a IAM user, so it can asume the account access role for the sub account
- We need to click in the Switch Role option after clicking our user name in the console.
- There we are going to fill 4 things:
- Account: This is the Account ID of the subaccount we want to access
- Role: OrganizationAccountAccessRole (or whatever thing you decided to put, if you didn’t trust me)
- Display Name: Anything that makes you confortable with, this is personal to your user, for example I like to put dev.mycompany
- Color: Also like Display name it is personal for your user, I like to use the following color codes
- Red: Production
- Green: Test
- Blue: Dev
- Black: Common - This way, if I need to add some Stagging or UAT environments I can always use the Orages depending on the severity.
- Press Switch Role and you will be in your new Environment Account, that is how we can refer to them from now on.