Cloudformation Basics
In this post we are going to see how to design a basic network for our company, we have several options to do it, one, for example, is to use the AWS Console and simply go and create our elements, and another option, that is what we think is the most recommended one is to use a CloudFormation template to script all the components that will be needed.
TL;DR If you are interested only in the CloudFormation Template go to section 6 :)
CloudFormation is the tool that allows us to model and the provision of our AWS systems. It is very interesting because it is based in the paradigm of “Infrastructure as Code” where we can define in a file, called Cloud Formation Template, all the elements that our system has, set up them and describe the relations between them. And when we want, we can deploy this AWS Cloud Formation Template (from now on the template) to create a Stack, that is the result of applying it.
And not only this! If we decide to update part of our stack, we just need to update the template, and since it is a file, we can use version control for it! Once the template has been updated, we just need to go to AWS CloudFormation and upload it again.
And if we want to delete all the elements, we can simply go to AWS Cloudformation, select our stack, press “Delete” and… boom! It will delete all the elements defined in the stack!
Just before we see a bit of action I would like to hook up this post with the previous one where we talk about multiple environments to stress how important and positive is for us to have EVERYTHING we can in a CloudFormation template: A CloudFormation template can be deployed in different environments, so, we do not need to be manually going through all our environments and creating with the console all the stuff we want, we just need to deploy our template! How cool is that!
In a future post, we will explain how to specify different things for different environments, for example, the instance type of an EC2 can differ between different environments.
So… enough talking and go to the ACTION!!!
Cloud Formation Template creation
Lupita has very basic requirements, she simply wants to have 2 subnets in her system, one of them, public and one of them, private This way her customers can access the elements placed on the public side and not on the private one.
I recommend you to create a Repository where you are going to keep your AWS CloudFormation templates and only your templates. Because if you decide to automatise your template deployment you don’t want to trigger stack creations just because you are changing an image, a document and, in general, anything that is related with your stacks
You can use JSON format or YAML format, I will use YAML because it is less verbose and you can add comments easily, at the same time you need to be much more careful with your spaces, the non-use of tabs…
1) Define your Stack
The following block is almost the most basic thing you can have (you could remove the description).
1
2
3
AWSTemplateFormatVersion: '2010-09-09'
Description:  This is the stack for the network in Lupita Enterprises
Resources:
The sections here are:
- AWSTemplateFormatVersion, this is the only version available and we need to indicate it
- Description, an optional section where we can write down some description about the template
- Resource, here is where we will write down the stuff!!!
2) Define the network mappings
This is an optional step but I like to have my IP’s centralised somewhere, and this is the Mappings section:
1
2
3
4
5
6
7
8
Mappings:
  SubnetConfig:
    VPC:
      CIDR: 10.0.0.0/16
    PublicSubnet:
      CIDR: 10.0.0.0/24
    PrivateSubnet:
      CIDR: 10.0.1.0/24
There is nothing special here, we define the CIDR we want to use when creating our VPC and our Subnets.
To see a bit more about CIDR click here to go to this post here
3) Create a VPC under resources:
1
2
3
4
5
6
7
8
9
10
Resources:
  VPC:
    Type: AWS::EC2::VPC
    Properties:
      CidrBlock: !FindInMap ['SubnetConfig', 'VPC', 'CIDR']
      EnableDnsSupport: true
      EnableDnsHostnames: true
      Tags:
      - Key: Name
        Value: !Sub ${AWS::StackName}-VPC
A VPC or Virtual Private Cloud is a private section of the Cloud that we can define. By default, when an account is created, AWS creates one for us, and it is called “default”, but, since we want to be able to create, re-create and delete stacks, is not too cool to be touching default stuff, especially delete default stuff.
Note: The “VPC” entry is an identifier selected by us, we could put there anything, but since we only have one VPC, make sense to use this name.
If we look into a bit more of detail the script we can see several entries, the first one is the type of the resource we are going to create AWS::EC2::VPC, not a lot to add about it.
Then we have a property section, let’s see it in detail:
-
CidrBlock: Indicates the set of IP’s that conform this Network, as the name indicates it is provided in CIDR notation. You could put here directly the value, like 10.0.0.0/16, but, as I commented before I prefer to have the network mappings centralised in the Mappings section, so here we have the reference. To do this reference we used one of the intrinsic functions AWS provides, FindInMap, that will go to the Mappings section and then find the element that is inside SubnetConfig.VPC.CIDR. More information about intrinsic functions here.
-
EnableDnsSupport: Boolean flag that indicates if AWS resolves DNS hostnames to any instance within the VPC’s IP address or not.
-
EnableDnsHostnames: Boolean flag that indicates if the instances get allocated DNS hostnames by default or not.
-
Tags section, finally we arrive at the Tags section, if you check the VPC properties there is no property such as “Name”, so we will create a tag for it:
- Key: Here we will select “Name”, as simple as that, this is what the tag is about :)
-
Value: !Sub ${AWS::StackName}-VPC
Hmmm… not as simple as the key, here we are using one intrinsic function, Sub that substitutes in the given string a variable by is value, in this case, ${AWS::StackName} will be substituted by its value. AWS::StackName it is a pseudo-parameter that AWS creates when we are creating the stack and contains the stack name we select.
4) Create our two internal subnets
1
2
3
4
5
6
7
8
9
10
11
12
13
14
15
16
17
18
19
20
# Block inside resources
  #Subnets
  PublicSubnet:
    Type: AWS::EC2::Subnet
    Properties:
      VpcId: !Ref VPC
      CidrBlock: !FindInMap ['SubnetConfig', 'PublicSubnet', 'CIDR']
      AvailabilityZone: !Select [ 0, !GetAZs ]
      Tags:
        - Key: Name
          Value: !Sub ${AWS::StackName}-PublicSubnet
  PrivateSubnet:
    Type: AWS::EC2::Subnet
    Properties:
      VpcId: !Ref VPC
      CidrBlock: !FindInMap ['SubnetConfig', 'PrivateSubnet', 'CIDR']
      AvailabilityZone: !Select [ 1, !GetAZs ]
      Tags:
        - Key: Name
          Value: !Sub ${AWS::StackName}-PrivateSubnet
In the script above you can see how to create the two subnets, the type is AWS::EC2::Subnet and they reference the VPC they belong to, using !Ref VPC, remember VPC is the identifier WE selected in the YAML.
The CidrBlock is done in the same way we did in the VPC section, retrieving the block from the Map.
What is very new is the AvailabilityZone property, when specifying Subnets we need to specify the Availability zone where we want the Subnet to be. To do so, we AGAIN make use of a couple of intrinsic functions that work very well together: GetAZs and Select
- GetAZs returns an array that lists Availability Zones for a specified region, if no parameter is specified, returns the Availability Zones for the region where the Stack is running.
- Select returns the element that occurs in the specified index of a given array.
By the way, our compact notation: !Select [ 0, !GetAZs ] is equivalent to this a bit more verbose, but easier perhaps to understand the first time:
1
2
3
4
    AvailabilityZone:
         Fn::Select:
         - 0
         - Fn::GetAZs: {Ref: 'AWS::Region'}
Finally, like with the VPC we are going to give a name to the subnets as we did with the VPC.
Note: The !Sub ${AWS::StackName}-VPC expression can be written also in the following way !Join ['', [!Ref "AWS::StackName", "-VPC"]] using the concatenation (Join) and the Reference functions (Ref), instead of just using the Substitution, and if you look for templates in the Web to get some references, they use them indistinctly. This is something I dislike a bit, and I think we should go for standardisation so everything looks similar and it is much easier to read and understand.
5) Create the Internet Gateway and attach it to our VPC
If you run our template now you will create a VPC with two subnets, but it won’t have an internet connection. So, if we want to add an internet gateway to provide connection just need to create one and attache it!
1
2
  InternetGateway:
    Type: AWS::EC2::InternetGateway
This block allocates an internet gateway for use with a VPC, simply that, it doesn’t connect to it or anything else, just creates it.
To link it with the VPC we will need to create an attachment:
1
2
3
4
5
  AttachGateway:
    Type: AWS::EC2::VPCGatewayAttachment
    Properties:
      VpcId: !Ref VPC
      InternetGatewayId: !Ref InternetGateway
Here we attache the two components together. By using the !Ref function, apart from the obvious (retrieval of the reference) we make sure that the components are already created since AWS works like this.
Note There is a parameter in our module called DependsOn, if you want to force AWS to create certain component before another one for some reason, then you can use it, for example, if we want AWS to create the VPC before the InternetGateway, and also link somehow the InternetGateway with the VPC it will be linked to it is a good idea to specify the DependsOn, just for clarity. In our case is not required, but I think it is a good practise because provides extra clarity.
1
2
3
  InternetGateway:
    Type: AWS::EC2::InternetGateway
    DependsOn: VPC
6) The complete stack
This way our complete stack should look like:
1
2
3
4
5
6
7
8
9
10
11
12
13
14
15
16
17
18
19
20
21
22
23
24
25
26
27
28
29
30
31
32
33
34
35
36
37
38
39
40
41
42
43
44
45
46
47
48
AWSTemplateFormatVersion: '2010-09-09'
Description:  This is the stack for the network in Lupita Enterprises
# CIRD groups that will be used by the resources
Mappings:
  SubnetConfig:
    VPC:
      CIDR: 10.0.0.0/16
    PublicSubnet:
      CIDR: 10.0.0.0/24
    PrivateSubnet:
      CIDR: 10.0.1.0/24
Resources:
  VPC:
    Type: AWS::EC2::VPC
    Properties:
      CidrBlock: !FindInMap ['SubnetConfig', 'VPC', 'CIDR']
      EnableDnsSupport: true
      EnableDnsHostnames: true
      Tags:
      - Key: Name
        Value: !Sub ${AWS::StackName}-VPC
  #Subnets
  PublicSubnet:
    Type: AWS::EC2::Subnet
    Properties:
      VpcId: !Ref VPC
      CidrBlock: !FindInMap ['SubnetConfig', 'PublicSubnet', 'CIDR']
      AvailabilityZone: !Select [ 0, !GetAZs ]
      Tags:
        - Key: Name
          Value: !Sub ${AWS::StackName}-PublicSubnet
  PrivateSubnet:
    Type: AWS::EC2::Subnet
    Properties:
      VpcId: !Ref VPC
      CidrBlock: !FindInMap ['SubnetConfig', 'PrivateSubnet', 'CIDR']
      AvailabilityZone: !Select [ 1, !GetAZs ]
      Tags:
        - Key: Name
          Value: !Sub ${AWS::StackName}-PrivateSubnet
  InternetGateway:
    Type: AWS::EC2::InternetGateway
    DependsOn: VPC
  AttachGateway:
    Type: AWS::EC2::VPCGatewayAttachment
    Properties:
      VpcId: !Ref VPC
      InternetGatewayId: !Ref InternetGateway
7) Deploy your Stack!
Log in into the AWS Console.
We have environments split into accounts like explained in this post, we are going to switch the Role to DEV
Then we go to CloudFormation service, and we select “Create Stack” with “New Resources”
Once here, you need to select “Template is ready” and “Upload a template file”, choose your template yml file.
Here something I like to do is to “View in Designer” if you have any small syntax error will be also highlighted here and then it will display the visual representation of your network:
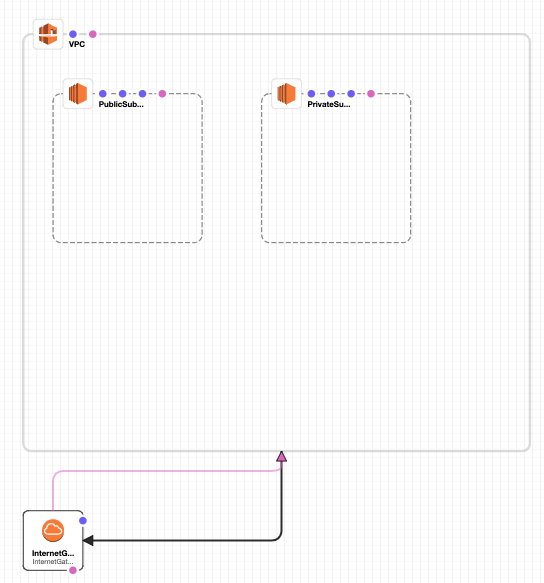 Cloud formation Diagram for Lupita Corporation’s Network
Note If you do not see your elements just zoom out :)
Now press the Create Stack button and the Stack, then Next, insert here a Stack Name, LupitaNetwork, in our case, next and in the Review LupitaNetwork proceed to Create the stack.
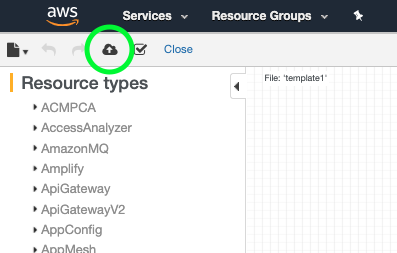 The create stack icon, not too easy to find…
This operation will start the creation of the Stack, we just need to wait a little bit (go to the Events view and press refresh to see how it is going):
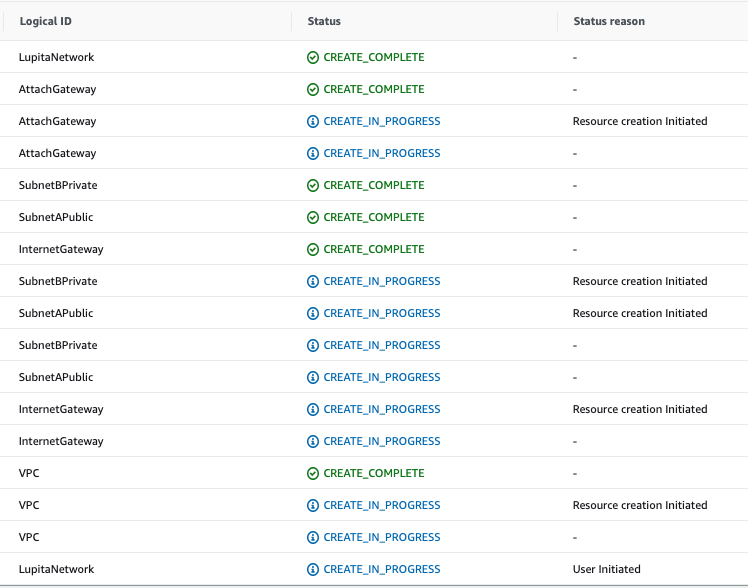 Cloud Formation events
And we are done!!!
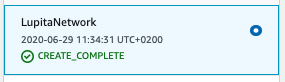 Cloud Formation result