Bastions EC2 Instance to provide access to VPC private areas

What is a Bastion Machine? Apart from a very fancy name, using simple words, a Bastion Machine is a machine that lives in a public subnet, being accessible from outside and will be used by the people to SSH, and once they are there, they can jump between the different elements of the VPC.
 This is a really nice looking and fancy bastion
Once you are inside the Bastion Machine you have an internal IP, so you can execute commands from there, for example, you can use scripts to deploy a service of yours.
This machine needs to be properly secured, we are going to do 2 things, create a Security Group, pretty heavy around it, and also will force the usage of Certificate Authentication, so no ugly eyes are around us.
Main diagram
So let’s see in a diagram what do we have now
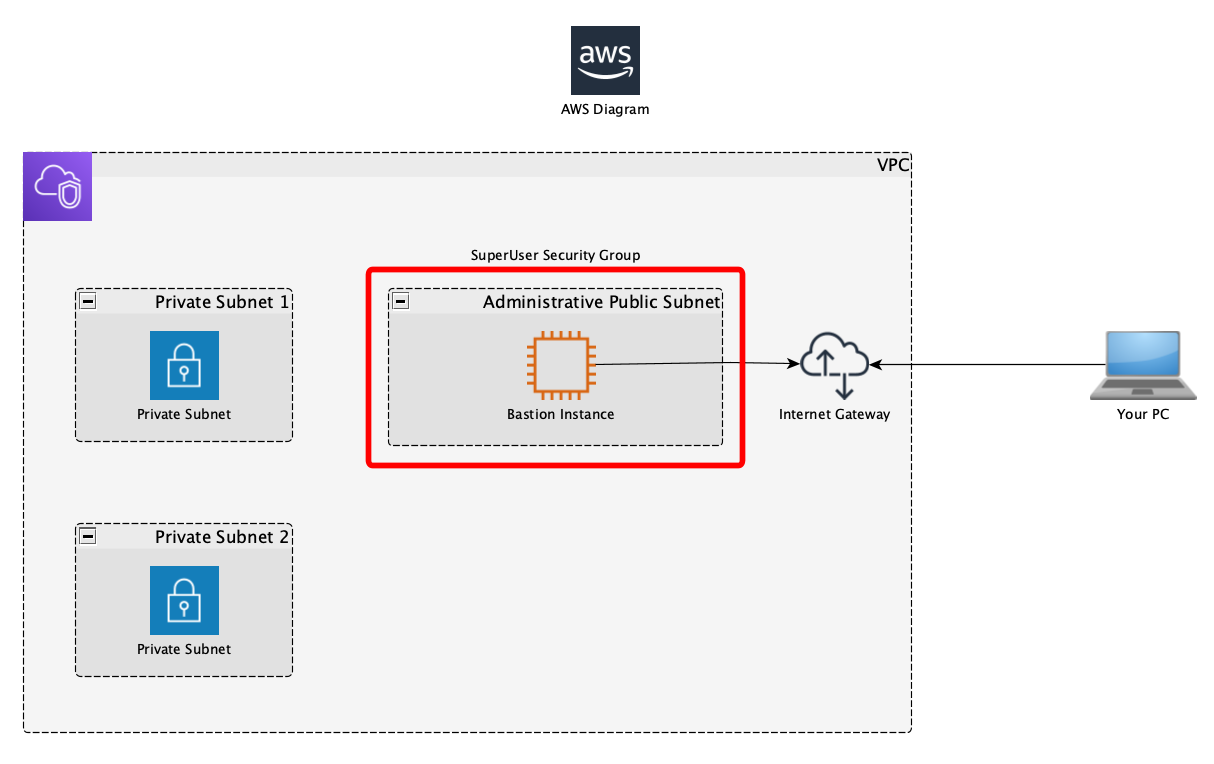 VPC Ready to get accessed from the outside world
So, let’s explain a little bit about what we have:
- Our VPC, with a CIDR of 10.0.0.0/16
- A Subnet called Subnet 1 that is private, without access to the internet, with a CIDR of 10.0.0.0/24
- An administrative subnet, with internet access, it has a CIDR of 10.0.100.0/24
- A security group that control the access: Admin Security Group
- A EC2 instance that will be the bastion machine
Admin Security Group
Then there are 1 security groups, marked in RED, the SuperUser administrative security group, in my mind, this is the security group that holds information about the super users that will be able to access this machine. How I have it configured is this way:
1
2
3
4
5
6
7
8
9
10
11
12
13
14
  SecurityGroupSSHSuperuser:
    Type: AWS::EC2::SecurityGroup
    Properties:
      GroupDescription: "Administrative security group, allow access from Static superuser IP to SSH"
      GroupName: SuperuserSSHSecurityGroup
      VpcId:
        Fn::ImportValue:
          !Sub "${NetworkStackName}-VPCID"
      SecurityGroupIngress:
        - Description: "Access to SSH"
          IpProtocol: "tcp"
          FromPort: 22
          ToPort: 22
          CidrIp: !FindInMap ['IPsPerSecurityGroup', 'AdminDiego', 'allowedCidrIp']
Where AdminDiego and the CIDR IP contains my external public IP (www.whatsmyip.com to see your Public IP)
So, if we recover our last post and we will add the security group we created there along with an output section since we are going to import the stacks in the VPN Host creation:
1
2
3
4
5
6
7
8
9
10
11
Outputs:
  AdminSubnet:
    Description: Admin subnet ID
    Value: !Ref SubnetAdmin
    Export:
      Name: !Sub "${AWS::StackName}-SubnetAdmin"
  SuperuserSecurityGroup:
    Description: Superuser Security Group ID
    Value: !Ref SecurityGroupSSHSuperuser
    Export:
      Name: !Sub "${AWS::StackName}-SuperuserSecurityGroup"
You can also have all together, but I rather prefer to have the instance separate, so in case of errors I can remove the stack super easily without touching anything else
EC2 Instance, the BASTION (how fancy it sounds!)
Now, let’s go and work on it!
1) Create our EC2 Instance in our Cloud Formation Template.
Important, as you can see I’m using a Key-Pair certificate that I created first, and then I can use it for my user. To create a Key-Pair:
E2 -> Network & Security -> Key Pairs -> Create key pair
1
2
3
4
5
6
7
8
9
10
11
12
13
14
15
16
17
18
19
20
21
22
23
24
25
26
27
28
29
30
31
32
33
34
35
36
37
38
39
40
41
42
43
44
45
46
47
48
49
AWSTemplateFormatVersion: '2010-09-09'
Description:  VPN Instance configuration

Parameters:

  NetworkStackName:
    Description: Main network stack
    Type: String
    Default: dev-network-frankfurt

  AdminNetworkStackName:
    Description: Main administrative network stack
    Type: String
    Default: dev-administrative-network-frankfurt

  ECSInstanceAMI:
    Type: AWS::EC2::Image::Id
    Default: ami-0b90a8636b6f955c1
    Description: An AMI for the relevant region for ECS

Resources:

BastionEC2Instance:
    Type: AWS::EC2::Instance
    Properties:
      ImageId: !Ref ECSInstanceAMI
      KeyName: dev-fk
      InstanceType: t3a.nano
      SecurityGroupIds:
        - Fn::ImportValue:
            !Sub "${AdminNetworkStackName}-SuperuserSecurityGroup"
      SubnetId:
         Fn::ImportValue:
           !Sub "${AdminNetworkStackName}-SubnetAdmin"

  VPNElasticIP:
    Type: AWS::EC2::EIP
    Properties:
      InstanceId: !Ref VPNHostEC2Instance

Outputs:
  VPNHost:
    Description: VPN Host EC2 Instance
    Value: !Ref VPNHostEC2Instance
  VPNHostPrivateIPAddress:
  	Description: VPN Private IP Address
    Value: !GetAtt ["VPNHostEC2Instance", "PrivateIp"]
  VPNHostIPAddress:
    Value: !GetAtt ["VPNHostEC2Instance", "PublicIp"]
Considerations:
- I’m using the cheapest instance I could find, t3a.nano, and it works fine for this task, at least considering it is for my dev environment.
- AMI: I’m using Ubuntu 20 in Frankfurt Region, I recommend you follow my pattern and save it into a parameter
- We need to have an ElasticIP associated to the instance to access to it
-
Outputs: We are publishing the EC2 Instance reference, the Public IP and the Private IP
- Since your server is secured by Key-Pair, you can, for testing, update your security group Ingress to something like the following:
1
2
3
4
      SecurityGroupIngress:
        - Description: "Allow all ingress traffic"
          IpProtocol: "-1"
          CidrIp: 0.0.0.0/0
2) Connect to our instance:
ssh -i ~/.ssh/dev-fk.pem ubuntu@THE_PUBLIC_IP
Note that our AMI is Ubuntu, so the User is ubuntu, if you are using, for example, AWS Amazon Linux then the user will be ec2-user
We are almost done!
3) To check that all is working fine create an additional Instance in one of the other Subnets to see how you can access to it from your bastion and how you cannot access to it from the outside world since it doesn’t have a public IP.
1
2
3
4
5
6
7
8
9
10
11
12
13
14
15
16
17
  AppEC2Instance:
    Type: AWS::EC2::Instance
    Properties:
      ImageId: !Ref ECSInstanceAMI
      KeyName: dev-fk
      InstanceType: t3a.nano
      SubnetId:
         Fn::ImportValue:
           !Sub "${AdminNetworkStackName}-SubnetAdmin"

Outputs:
  AppEC2InstanceId:
    Description: App EC2 Instance Id
    Value: !Ref AppEC2Instance
  AppEC2IP:
    Description: App EC2 Private IP
    Value: !GetAtt ["AppEC2Instance", "PrivateIp"]
NOTE: Since you are going to access to this servers from the Bastion you will need to activate SSH Agent forwarding so your key goes with you when doing the ssh.
Connect to the bastion:
- You need to protect the key file, with wider permission will be ignored
1
$> chmod 400 dev-fk.pem
- Add the key
1
2
$> ssh-add -K dev-key.pem
Identity added: dev-key.pem (dev-key.pem)
- Check is there
1
2
$> ssh-add -L
ssh-rsa AA..................... dev-key.pem
- Now connect!!! NOTE THE -A
1
$> ssh -A ubuntu@THE_PUBLIC_BASTION_IP
- Now JUMP to the Private Instance (note the Private IP of the Bastion: 10.0.10.80)
1
ubuntu@ip-10-0-10-80:~$ ssh ubuntu@THE_PRIVATE_IP_OF_THE_APP
We are done now!!!!
–
Imagine how film-like sound a conversation like the following:
1
2
3
4
5
6
7
8
9
- Commander, I need to access the bastion.

- And from there you will be able to jump into the private network?

- I think so, wish me luck, Sir...

- Corporal!!! You forgot the Agent Forwarding!!!!

- Aaaarrrgggggg
Some American flag, some fire, explosions…